
How to Use Conversational Forms
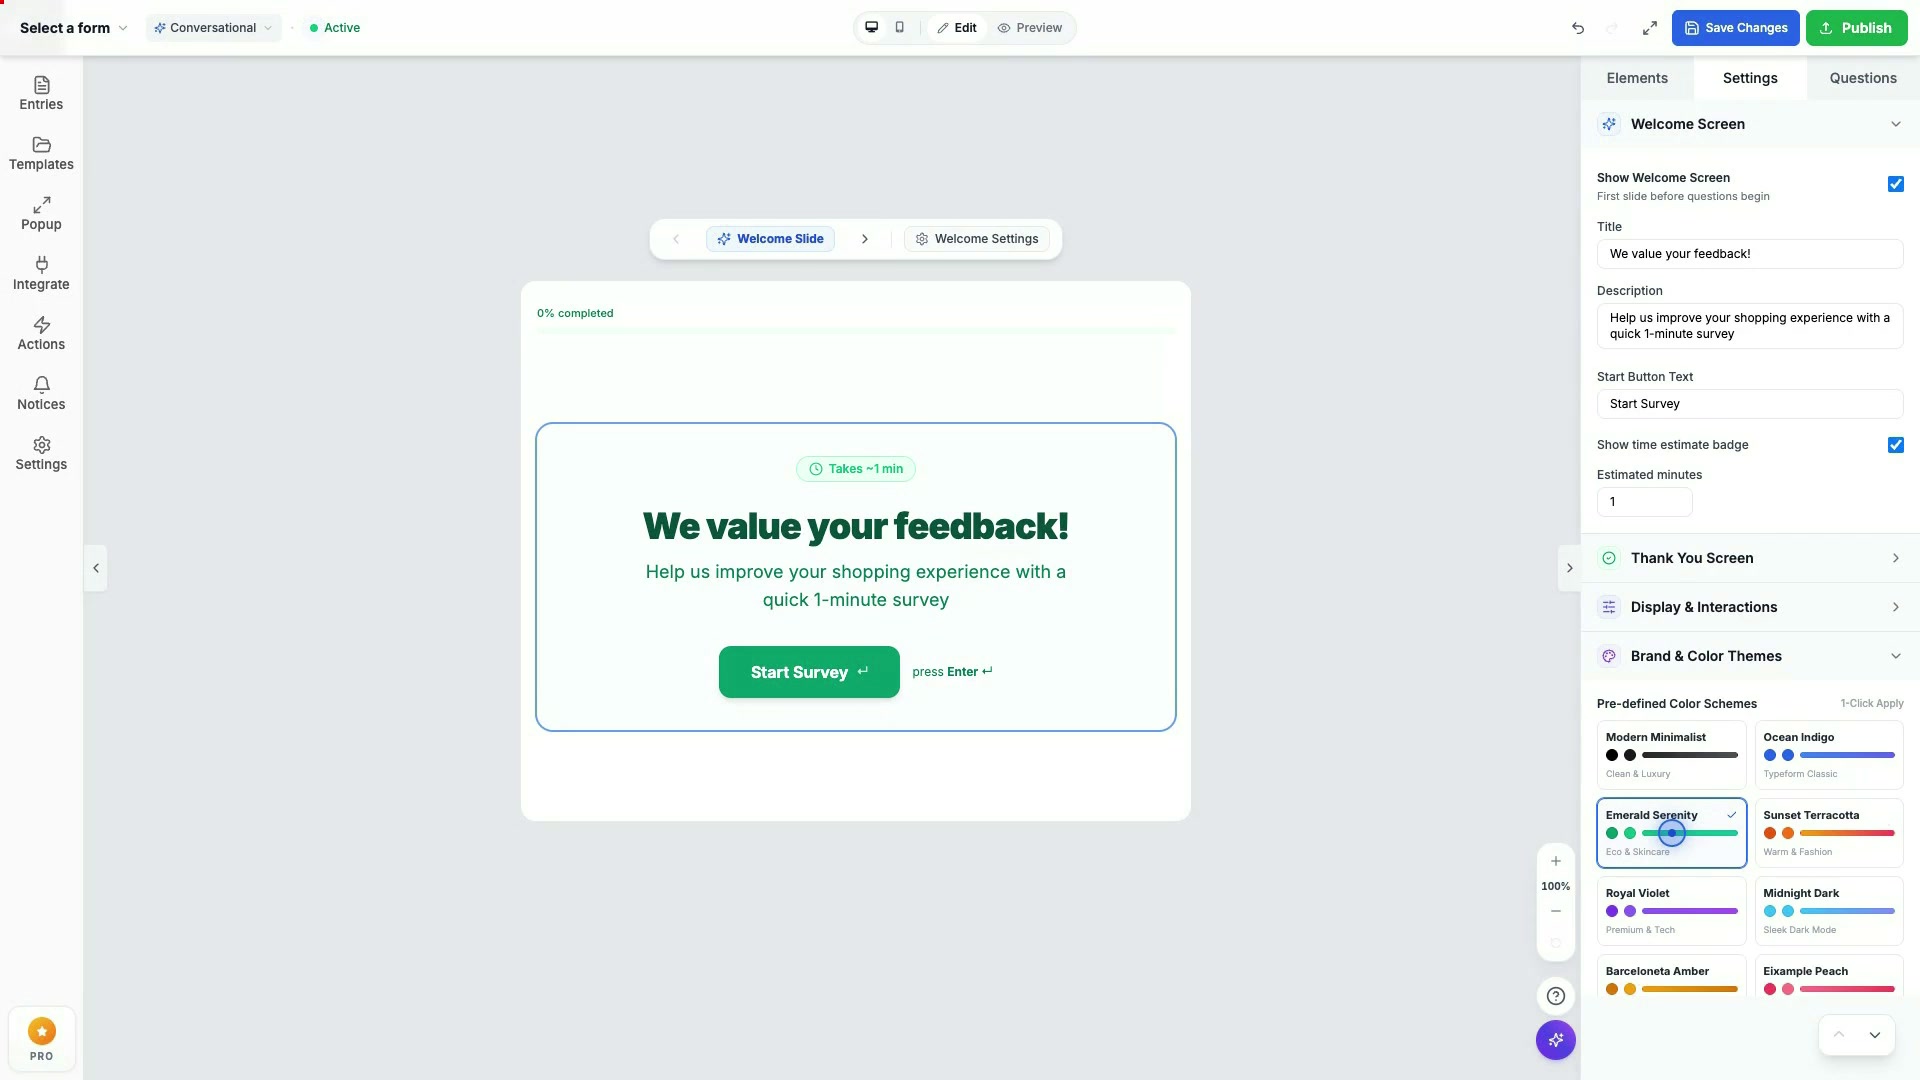
Conversational Forms Showcase
Interactive 1-question-at-a-time forms with answer piping, keyboard shortcuts, and 14 theme presets.
Traditional static forms often overwhelm shoppers with dozens of visible input fields all at once, leading to an industry-average 68%+ mobile abandonment rate. Formpify's Conversational Forms transform standard forms into seamless, 1-question-at-a-time interactive journeys — giving your store the sleek engagement of Typeform natively inside Shopify, with zero iframe speed penalties.
Step 1. Enable Conversational Mode in Your Form
You can turn any existing form into a conversational flow or start fresh with a dedicated template:
- From an Existing Form: Open the form in Formpify's visual drag-and-drop builder. In the right sidebar, select Form Settings → Display & Layout, then switch the layout mode to Conversational (One Question at a Time).
- From the Template Library: In the dashboard, click Create Form, navigate to the Conversational category, and select one of the pre-configured templates (e.g., Product Recommendation Quiz, Customer Feedback Survey, or VIP Lead Intake).
Step 2. Configure the Welcome Screen
The Welcome Screen greets your respondents before the first question appears, priming them for high completion rates:
- Headline & Subtitle: Clearly explain the purpose and benefit of the form (e.g., "Find Your Perfect Skincare Match in 60 Seconds").
- Start Action Button: Customize the call-to-action text (e.g., "Start Survey", "Take the Quiz", or "Get Started →").
- Time-to-Complete Badge: Enable the estimated completion time indicator (e.g., "Takes ~1 minute"). Setting clear expectations up front has been shown to increase form start rates by over 40%.
Step 3. Add Slide Questions & Choose Field Types
Every field you place in the builder automatically becomes an individual, distraction-free slide. Formpify supports a comprehensive array of question types:
- Text & Paragraph: Single-line input for short answers, or multi-line area for detailed feedback.
- Email & Phone: Built-in syntax validation, international country flag selector, and smart mobile keypad activation.
- Multiple Choice / Single Select: Clean card-style radio buttons mapped to instant one-key shortcuts (A, B, C, D).
- Checkboxes / Multi-Select: Allow respondents to pick one or more options with clean visual checkboxes.
- Rating Scales & Stars: 1-5 or 1-10 satisfaction ratings, NPS scoring, and visual star indicators.
- Dropdown Selectors & Date Pickers: Clean menus for selecting locations, time slots, or appointment dates.
- Secure File Uploads: Let customers upload photos, mockups, or receipts directly from their mobile camera or desktop.
Step 4. Personalize with Dynamic Answer Piping (@variable)
Dynamic Answer Piping allows you to recall responses from earlier questions and inject them directly into subsequent question titles or descriptions, creating an authentic 1-on-1 dialog:
- How to Pipe: While editing any question title, subtitle, or Thank You screen, type
@to reveal the token picker dropdown. - Practical Example: If Question 1 collects the respondent's first name as
@customer_name, Question 2 can automatically read: "Great to meet you, @customer_name! What type of coffee roast do you prefer?". - Conditional Reassurance: Dynamically referencing a user's prior choices builds trust and keeps completion momentum high.
Step 5. Choose from 14 Designer Themes
Formpify comes pre-loaded with 14 designer color palettes crafted for luxury storefronts, tech brands, and vibrant boutiques alike:
- Curated Palettes: Switch with a single click between Emerald Serenity, Terracotta, Clean Minimalist, Ocean Indigo, Midnight Slate, Royal Violet, and more.
- Granular Brand Controls: In the Theme tab, fine-tune background gradients, question typography, input border thickness, active focus glows, and button border radiuses.
- Progress Bar: A sleek real-time progress bar runs across the top or bottom of the slide, indicating the percentage of steps completed.
Step 6. Frictionless Keyboard Glide Navigation
On desktop and laptops, shoppers can complete your entire form without ever taking their fingers off the keyboard:
Enter: Confirm current input and glide smoothly to the next question.Shift + Enter: Insert a clean line break inside paragraph text areas.A,B,C,D: Instantly select options in multiple-choice questions and automatically advance.↑/↓(Up/Down Arrows): Seamlessly jump back to review or edit previous answers.
On mobile devices and tablets, smooth swipe gestures and thumb-friendly navigation buttons ensure an equally fast, zero-friction experience.
Step 7. Customize the Thank You Screen & Post-Submit Actions
After the final question is answered, seal the deal with high-impact post-submission actions:
- Personalized Thank You Screen: Display custom confirmation text, discount codes, or dynamic recommendations based on their answers.
- Automatic Shopify Customer Tagging: Automatically attach tags to the customer profile in Shopify Admin (e.g.
lead-tier-a,quiz-oily-skin) to enable automated marketing flows in Klaviyo or Shopify Email. - Instant Email Notifications: Send immediate alerts with full response summaries to your sales or support inbox.
- Automated URL Redirect: Automatically send the shopper to a specific product page, checkout cart, or custom landing page after submission.
Step 8. Publish Natively to Your Shopify Theme
Unlike third-party survey tools that embed through heavy external iframes, Formpify forms render as native Online Store 2.0 App Blocks:
- Zero Iframe Penalty: Renders directly into your store's DOM with zero Cumulative Layout Shift (CLS: 0) and lightning-fast execution.
- Theme Auto-Sync: Automatically inherits your store's global fonts and color scheme for a cohesive, professional appearance.
- One-Click Embedding: In your Shopify Theme Editor, click Add Block → Formpify Form, select your Conversational Form ID, and hit Save.